Drawing a corner-cut rectangle three times in PowerPoint can turn one lesson into three small design jobs: one for missing lengths, another for area and another for perimeter. A composite shape drawing tool offers a more useful starting point. In Zairoo.Ai Free Pad, you can prepare the outline and dimension annotations in a dedicated maths workspace, then reuse that base for the different explanations. The preparation stays centred on one figure, rather than on making separate slide objects agree. Your effort goes into choosing what each question reveals, not reconstructing the same shape for every teaching purpose.
Make one composite outline work across the lesson
Area, perimeter and missing-length questions can share a drawing while asking pupils to notice different things. Free Pad gives you shape and Slice controls for the outline, plus Text and Length Arrow for its dimensions. A grid and Layers help organise the construction as you prepare it. Keeping those elements in a maths workspace reduces the repeated assembly involved in making each teaching view from scratch. The result is a useful base figure that supports the whole lesson, with your attention on the information each view needs to show.
Reuse the base and change the explanation
Keep an exported base figure alongside the annotated teaching versions so the next material starts with the same geometry. PNG and SVG export let you carry the drawing into the slide or document format you already use. One teacher check of the shared outline and givens establishes a reliable reference for these versions. From there, prepare the particular labels or region split needed for each explanation. This approach puts the value in reuse: less rebuilding of the cutout and dimension arrows, and more preparation time directed towards the distinction between surface, boundary and missing lengths.
Fix the geometry, vary the thinking
Use a 14 cm wide, 10 cm high rectangle with a 6 cm wide, 4 cm high rectangle removed from the top-right corner. All edges are horizontal or vertical and adjacent boundary edges are perpendicular. The remaining shape is one connected region. This specification matters: a hole in the middle would introduce an additional boundary and would not be the same problem.
Construct the shape in Free Pad, then add Text and Length Arrow annotations. Prepare an outline-only question view, an area explanation and an outside-boundary explanation. Use the same orientation throughout. When switching between views, ask pupils what changed in the explanation and what stayed fixed in the underlying figure.
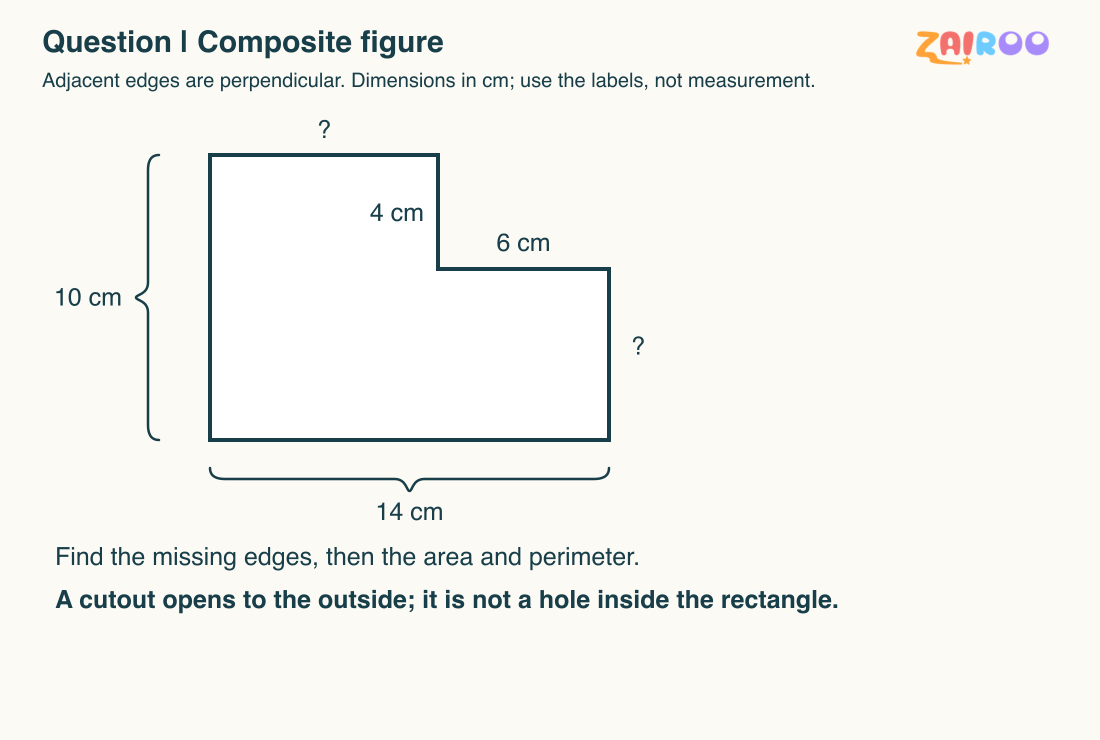
The enclosing rectangle and the removed corner supply four givens. The remaining top and right edges are found from the corresponding whole dimensions.
Original three-part classroom question
A rectangular notice card measures 14 cm by 10 cm. Its top-right corner, measuring 6 cm by 4 cm, is removed. Find the remaining top edge and right edge. Then calculate the remaining area and the perimeter. Explain why a line drawn inside the figure to split its area should not be added to the perimeter.
Before calculation, ask pupils to point to the whole width and the whole height. The P4 rectangles and squares guide gives relevant prerequisites: equal opposite sides and four right angles. An answer based on the apparent drawing size is not enough; each missing length must follow from stated dimensions.
Missing lengths come from matched spans
14 - 6 = 8 cm: remaining top edge.
10 - 4 = 6 cm: remaining right edge.
Ask: Why does the 6 cm cutout width belong with 14 cm rather than 10 cm? Two lengths share the value six, but one is a horizontal given and the other is a vertical result. Do not let identical numbers hide different roles. Label directions clearly in the explanation.
Area describes the remaining surface
14 x 10 = 140 cm squared: full enclosing rectangle.
6 x 4 = 24 cm squared: removed corner.
140 - 24 = 116 cm squared: remaining surface.
The P4 area and perimeter guide supports composite-rectangle splitting and the distinction between surface and boundary. Shade only the region being counted. The missing corner is useful in the calculation but is not part of the remaining card.
Perimeter follows six actual edges
8 + 4 + 6 + 6 + 14 + 10 = 48 cm: complete outside boundary.
Trace the path with a finger, starting at the upper-left corner and returning to that point. Include both inward corner edges because they touch the outside of the remaining region. Do not subtract the cutout's whole perimeter: two of its edges were never internal boundary edges of the remaining card.
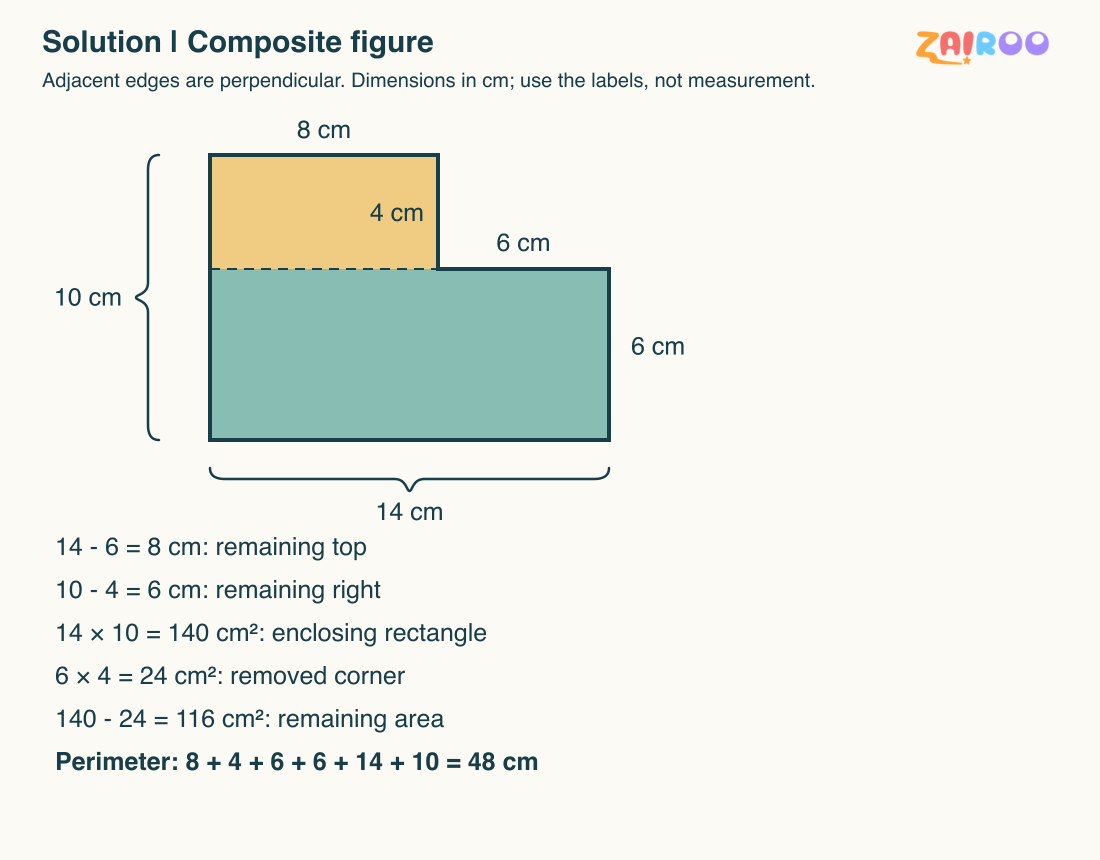
The internal split separates two area regions. The perimeter instead follows the continuous six-edge boundary, including the inward step.
Independent checks and discussion
14 x 6 = 84 cm squared: lower rectangle.
8 x 4 = 32 cm squared: upper-left rectangle.
84 + 32 = 116 cm squared: independent area check.
2 x (14 + 10) = 48 cm: independent perimeter check.
Ask: How can this shape lose area without changing that perimeter? Which old boundary lengths were replaced by equal new lengths? Would a diagonal cut behave the same way? Keep the last question as a comparison discussion, not an invitation to apply the corner-removal rule to every cut. For an exit question, ask pupils to describe the two measures without using the words area or perimeter. Look for a description of covering the remaining surface and a description of travelling around its edge. These explanations reveal whether the distinction survives beyond the formulas.
Fresh retry with complete answers
A 12 cm by 9 cm rectangle loses a top-right corner 4 cm wide and 3 cm high. Find both remaining edge lengths, its area and perimeter.
12 - 4 = 8 cm: remaining top.
9 - 3 = 6 cm: remaining right.
12 x 9 = 108 cm squared: enclosing area.
4 x 3 = 12 cm squared: removed area.
108 - 12 = 96 cm squared: remaining area.
8 + 3 + 4 + 6 + 12 + 9 = 42 cm: perimeter.
Teacher FAQ
Must all three questions be shown together? No. Start with missing lengths, then use the same outline to distinguish area from perimeter. Ask pupils to explain the units before giving their totals. How can I prepare a handout? Use Download PNG or Download SVG in Free Pad's Export menu, with Transparent background if useful, then manually place the image in a separate document editor. Add your question wording and working space there.
Email business@zairoo.ai for a composite-diagram demo and discuss educator access. For families seeking homework support, explore the separate parent platform; it is not the educator demo route.