Copying a composite diagram across five PowerPoint slides can leave you chasing a dimension label that shifted between explanation stages. Useful maths lesson preparation tools help you keep the drawing work together before building the presentation. With Zairoo.Ai Free Pad, prepare the base outline and annotations in a dedicated workspace, then use that figure as the reference for your staged views. You still choose the sequence of the explanation; the practical gain is not starting the drawing again whenever the lesson moves from identifying a length to showing a split or calculating an area.
Prepare the master figure before the explanation sequence
A staged area lesson needs a stable outline more than it needs another decorative slide. Free Pad brings the shape, dimension arrows and text into one construction space, with a grid and Layers available to organise the drawing. That makes it a useful home for the master figure before you prepare the individual teaching views. Start the sequence from that reference rather than rebuilding the cutout on each slide. The preparation becomes about which annotation belongs at each moment, not about whether the underlying picture still matches the previous version.
Spend the next edit on the teaching step
PNG and SVG export let you carry prepared figures into the presentation you already use. Keep the base and explanation versions together, ready for another class or a related handout. A teacher check of the shared dimensions and the added working gives the sequence a sound foundation. You can then focus on the transition between views: an unknown length becomes known, or a useful partition appears. Reusing that drawing work makes the next lesson edit more purposeful, with less repeated construction and more attention to the explanation you want pupils to follow.
Write a master specification
For this P4 lesson, start with an enclosing rectangle 18 cm wide and 13 cm high. Remove a top-right rectangle 7 cm wide and 5 cm high. Adjacent boundary edges are perpendicular. The classroom question is: Find the remaining area by splitting the shape into two rectangles, and check it using the enclosing rectangle. First determine the missing lengths needed for your split.
This question makes the method part of the task. Pupils must select a useful partition, identify its dimensions and compare two valid calculations. It is not merely a larger-number version of a rectangle question. Keep the original four givens in every prepared view; a pupil should be able to track each later number back to a stated dimension.
Construct the outline in Free Pad and add dimensions with Text and Length Arrow. Prepare each view from the same dimension plan. Whether your usual approach involves redrawing a figure or copying it between pages, compare the outlines before teaching: the explanation should change, but the shape and its givens should not.
Stage one: show only the task
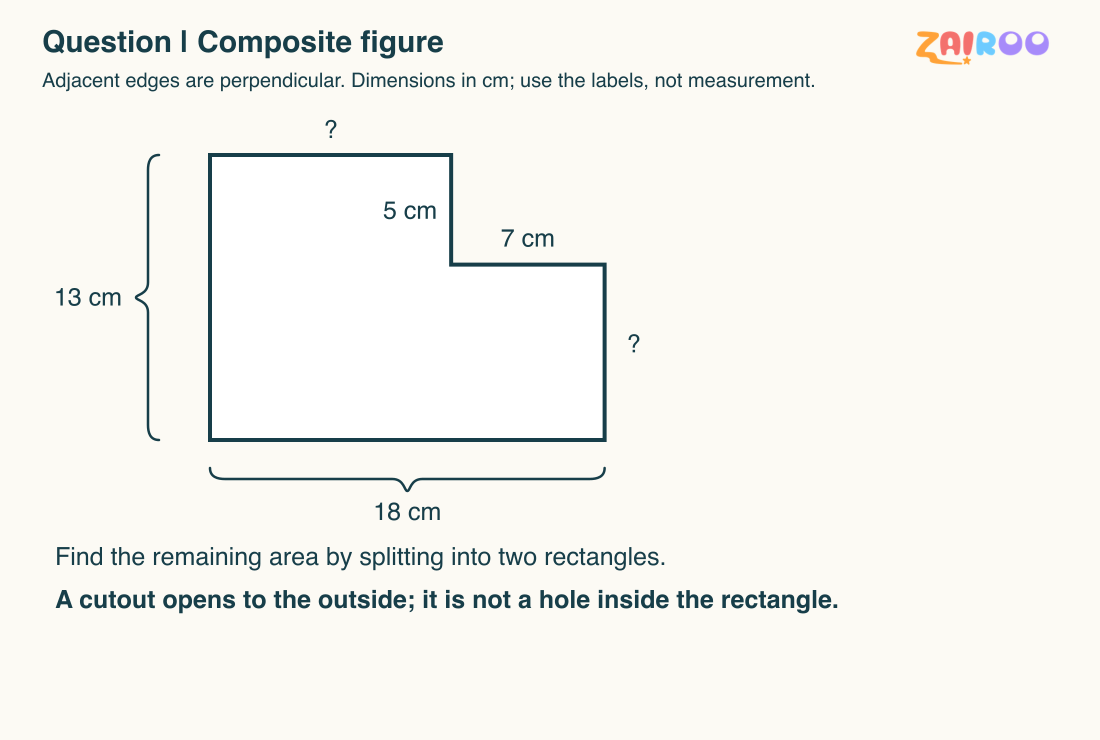
The initial view presents only the enclosing rectangle and the removed corner. Pupils first identify the remaining region before choosing a calculation.
Ask pupils to describe the missing region without calculating. Where was the rectangle removed? Which part of the drawing is still card? Referring to the P4 rectangles and squares guide, revisit how opposite sides and right angles constrain the enclosing rectangle. A sketch should not introduce a sloping edge or a second cutout.
Stage two: recover the missing lengths
18 - 7 = 11 cm: remaining top edge.
13 - 5 = 8 cm: remaining right edge.
In the next prepared view, add these two results in a different annotation colour while leaving all edges fixed. Ask: Which horizontal spans combine to 18 cm? Which vertical spans combine to 13 cm? Require the direction of each subtraction as well as its answer.
Stage three: choose and justify a split
Draw a horizontal internal line from the inner corner to the left boundary. It separates an 18 cm by 8 cm lower rectangle from an 11 cm by 5 cm upper-left rectangle. The regions do not overlap and together cover all the remaining card.
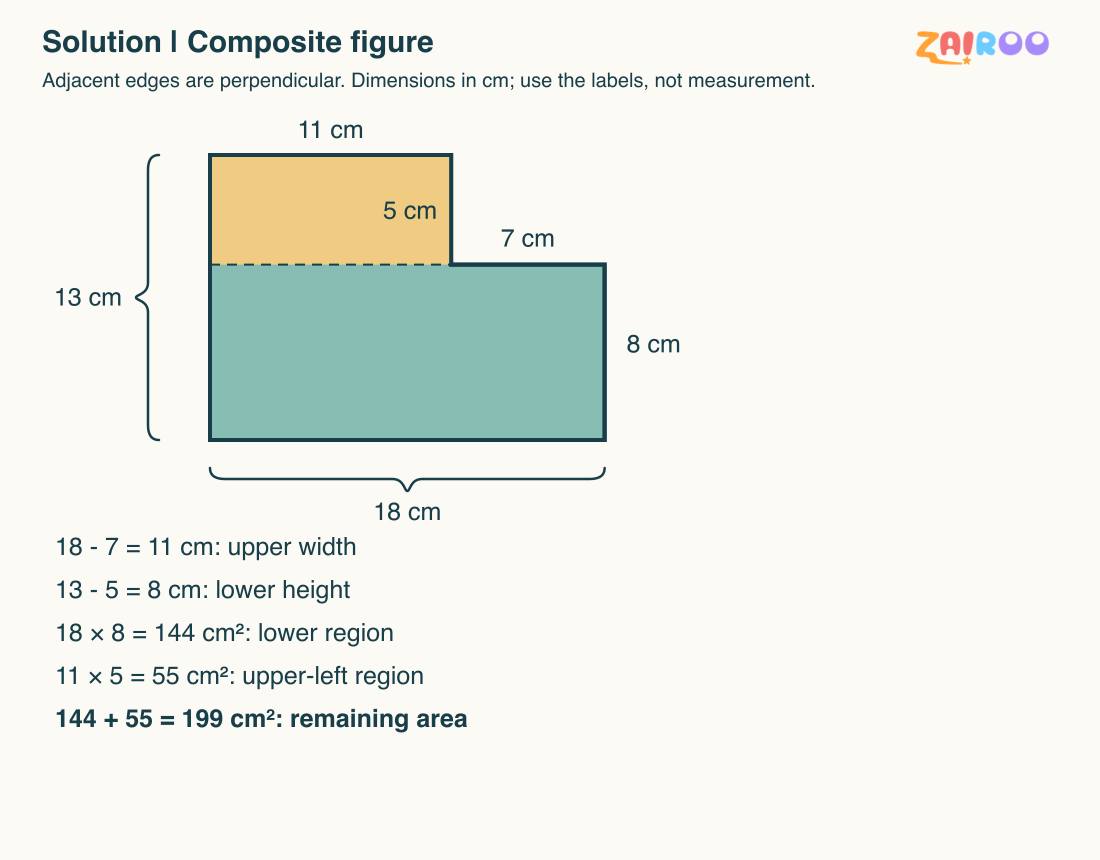
The split creates a lower rectangle and an upper-left rectangle. Each region has its own pair of dimensions and contributes once to the total area.
The P4 area and perimeter guide provides context for splitting composite rectangles. Invite a pupil to trace both regions and explain why neither includes the removed corner. A line used for area reasoning remains internal; it would not become an additional perimeter edge.
Stage four: calculate one region at a time
18 x 8 = 144 cm squared: lower rectangle.
11 x 5 = 55 cm squared: upper-left rectangle.
144 + 55 = 199 cm squared: complete remaining area.
Keep each calculation on its own line beside the reason, rather than placing a crowded chain of symbols over the figure. Ask pupils to match each product to its shaded region. A correct total with dimensions attached to the wrong region still needs discussion.
Stage five: check by another route
18 x 13 = 234 cm squared: enclosing rectangle.
7 x 5 = 35 cm squared: removed corner.
234 - 35 = 199 cm squared: independent area check.
Before the lesson, compare all prepared views side by side. Check that labels, orientation and cutout location have not drifted. At the intended display size, every dimension should have a clear target. Free Pad's Export menu offers Download SVG and Download PNG, with an optional Transparent background. Export each prepared view and manually place it in a separate document editor for your lesson notes or handout.
Fresh retry
A 17 cm by 12 cm rectangle loses a top-right corner 6 cm wide and 5 cm high. Use a horizontal split and then subtraction to check.
17 - 6 = 11 cm: top length.
12 - 5 = 7 cm: lower height.
17 x 7 = 119 cm squared: lower region.
11 x 5 = 55 cm squared: upper region.
119 + 55 = 174 cm squared: area by splitting.
17 x 12 = 204 cm squared: enclosing area.
6 x 5 = 30 cm squared: removed area.
204 - 30 = 174 cm squared: checked result.
Preparation FAQ
How do I choose when to move to the next view? Ask pupils to name the dimensions needed for the next calculation. If they cannot connect a number to its edge, pause at the current stage. Should both methods be taught together? Establish one complete method first, then use the second to check the same region.
Email business@zairoo.ai for a Free Pad educator demo with your lesson topic. For families seeking homework support, explore the separate parent platform, not educator demo access.